
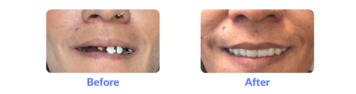
CASE 1 – IMMEDIATE DENTURES
(Click on image to enlarge)
For additional before pictures click here. CAUTION: some viewers may find some of these images difficult to view.
The following case was a very challenging one but it’s a prime example of how dentistry can change and improve the quality of one’s life and it’s the reason why I am passionate about dentistry. While the treatment course resulted in a more confident, beautiful, and aesthetic smile, more importantly it resulted in the improvement of the patient’s overall health!
Pre-treatment Summary
Before coming to our office for treatment, this patient was suffering from frequent mouth infections that were being treated with antibiotics in the emergency room. Overtime, the frequent use of antibiotics to treat these infections would lead to future infections becoming resistant to antibiotic medications and the patient did notice that antibiotics were taking longer to clear an infection and infections were growing more severe. If the root cause of the condition was not addressed, this condition would eventually lead into a life-threatening situation where the month infections could spread to the brain or other parts of the body; in this context, this patient urgently needed emergency dental treatment to correct the issue.
This case is also a reminder that while an emergency room will treat the symptoms involving mouth issues, they are generally not the place to actually fix the root cause of the issue. Mouth issues should be addressed by a general dentist or a dental specialist. Another reminder is that getting regular dental checkups and oral care would not only prevent these types of conditions in the first place, but would also prevent the need for more expensive and extensive oral procedures to correct the issue.
Treatment Description
Step 1-Initial Consultation, Examination, and Treatment Options
A full set of x-rays and a thorough dental examination was performed to fully assess this case. We also evaluated the current medical condition including medications, allergies and previous surgeries.
The examination revealed that the only option left available to this patient was to extract all of her teeth and create a full set of dentures. Other treatment options would have been possible if some of the remaining teeth were intact. The term “immediate denture” is used when patients have to have all of his/her teeth removed and a denture is placed the day of the surgery. Most of the times these dentures are not very accurate and a more permanent denture needs to be fabricated a few months or weeks after teeth are extracted.
Step 2-Consultation with Oral Surgeon
Given the condition of the teeth and complexity of the case, an oral surgeon was required for the removal of all the teeth and a consultation with the oral surgeon was needed in order to coordinate the delivery of the dentures.
Step 3-Pre-Operatory Impression
An appointment was scheduled to make an impression before teeth were extracted. The impression was sent to the laboratory to create bite rims. A bite registration was taken in order to create an accurate relationship of the upper and lower arches. Also, color and size of her teeth were chosen. The bite registration and molds were sent to a laboratory to have the immediate denture created.
Step 4-Teeth extractions
Teeth and roots were extracted by an Oral Surgeon under sedation. A special thank you to Dr. Schaner and his wonderful team at Atlanta Oral and Facial Surgery who performed the surgery on this patient. The immediate dentures were delivered by Oral Surgeon.
Step 5-Immediate Denture and Reline
The immediate dentures were loose and teeth were a little too big for this patient. A soft reline was done to best fit the dentures to the mouth while waiting for the mouth to fully heal, a process that can take 3 months to 1 year.
Step 6-Denture
It is recommended to wait at least 3 months before getting new dentures to allow for bone healing. If possible, it is recommended to try to place implants to ensure a stable set of dentures. There are also over the counter products that patients can use like fixodent or polygrip to help with adhesion of these dentures.
After bone and soft tissue was healed sufficiently and no mouth infections detected, we were able to create a more accurate and better fitting denture. It is possible that a “hard” reline procedure is needed after about 1 year when the bone and mouth should be completely healed.
Post-Treatment
To date, the patient has not had another mouth infection requiring the use of antibiotics and can now enjoy eating a wider variety of foods. It has been more than one year and the patient reports than the denture continue to fit and function well.
Lastly, with the new teeth, the patient has a new sense of confidence and the patient continues to express to us how happy she is with the outcome of the treatment. She said you guys literally saved my life!
CASE 2 – WHITE SPOTS ON TEETH
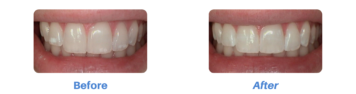
Did you know there is a non-invasive treatment called ICON Resin Infiltration that removes or significantly lessen bright white spots on teeth? These spots are called: hypo spots, enamel bruising, or decalcified white spot lesions.
Over the past several years, we have had a number of new patients with these lesions and are surprised their previous dentists never made them aware of treatment options available to remove them. This is precisely what happened with this patient. This patient came for a regular cleaning and I noticed the white spots on the teeth and began talking to the patient about it. The patient indicated these spots has always bothered her but her previous dentists never mentioned or presented this treatment to her as an option to consider. After explaining and providing more information about the ICON Resin Infiltration treatment, the patient decided to do it and the result were fantastic!
To learn more about the treatment itself, you can visit our ICON Resin Infiltration page.
astly, with the new teeth, the patient has a new sense of confidence and the patient continues to express to us how happy she is with the outcome of the treatment. She said you guys literally saved my life!
CASE 3– ZOOM TEETH WHITENING TREATMENT
By Larry Shorey
“Every time you SMILE at someone, it is an action of love, a gift to that person, a beautiful thing”— Mother Teresa
About Teeth Whitening
The practice of teeth whitening can be traced back 4,000 years ago to the ancient Egyptians where white teeth was considered a mark of beauty and a sign of wealth. The Egyptians created a whitening paste by grounding pumice stone mixed with white vinegar. Fast forward to the 21st century and teeth whitening technology as one can imagine has advanced significantly in modern times.
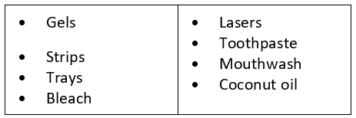
Today, teeth whitening options vary significantly as well as their effectiveness and costs also. Some available options include:
With some many options available, which is the best option for you? To answer that question, it will largely depend on 4 key factors including:
- How much you are willing to spend?
- How fast you want to experience the results?
- How long you want the effect to last?
- How sensitive your teeth are?
- How much inconvenience you are willing to tolerate? (including the time you are willing to spend on the treatment and teeth sensitivity on a case by case)
To learn more about various teeth whitening options, speak with your Dental Hygienist or Dentist. Dentaly.org also has a very good article about teeth whitening as well.
While this article will not discuss each option available, I will describe my most recent experience using the Philip’s Zoom WhiteSpeed teeth whitening treatment.
Zoom WhiteSpeed Treatment Description
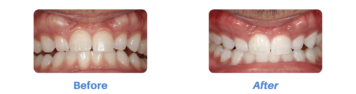
The Zoom WhiteSpeed treatment must be done in-office by trained dental professionals. The main advantage of this treatment is that in a relatively short time, you can have very noticeable white teeth that will last for several months, however this treatment does cost more than other options. The treatment involves the following:
1. Teeth Shade, Pictures and Questions (Impressions for at Home Trays if Needed)
The dental professional will check your current’s teeth shade and will also take pictures to compare with the after-treatment results. This is good time to ask questions about the procedure. A set of molds will be done at this point, if you decided to have at home trays to touch up your bleaching after several months.
2. Mouth and Teeth Preparation Teeth
The dental professional will then prep your mouth. In my case, this preparation included the use of a cheek retractor and the application of a gel to protect the gums from the light and application of advanced whitening gel to your teeth. Since the cheek retractor stays on during the entire process, a ringing bell was provided to me to alert the staff should I need assistance. This preparation process took about 15 minutes.
3. Zoom WhiteSpeed Lamp
Once the mouth and front teeth are prepared, the dental professional positioned the Zoom WhiteSpeed lamp on top of the cheek retractor and began the first stage by shining the blue LED light on the front teeth. To accelerate the whitening process, the lamp’s has variable light intensity settings. In my case, the setting was on medium. I did experienced some sensitivity on by bottom teeth within 2-3 minutes of the start of the first stage but that lasted for about 1-2 minutes and the rest of the treatment was painless. Safety google were provided to protect my eyes and a set of headphones. It was nice to have headphones those are optional. You won’t be able to read but you can listen to your favorite podcast!
4. Repeat!
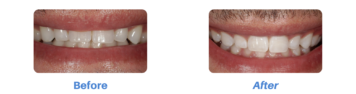
The light process is repeated 2-3 more times with each session taking about 15 minutes for a total of 45 minutes. I had the option to do the recommended 4th session but my mouth was getting tired and at that point its diminishing return on the whitening of teeth. With three sessions I was able to get a noticeable whiter smile. There is not a huge difference between the 3rd and 4th session.
5. Sensitivity Control
Once the light treatment is done, the dental professional will apply or provide you with a post-treatment gel (relief gel) to help protect the enamel and reduce sensitivity.
The first time I went thru this treatment, I forgot to apply this gel and within 5-10 minutes of finishing the treatment, I did experience very sharp and sensitive sensation in some of my teeth. These sharp sensations are known as zingers and I was reminded to apply the gel. Once I applied it, I had no issues with sensitivity afterwards.
The second time I went thru the Zoom treatment, I had asked the dental professional to apply the sensitivity gel right after the treatment was done and I did not experience any significant sensitivity.
It is also recommended to brush with sensitivity tooth paste 1-2 weeks prior to the procedure this significantly reduces the sensitivity. You can also take an ibuprofen or Tylenol prior to starting the procedure.
6. Post Treatment Maintenance
Before you leave your dentist’s office as part of the treatment price, you’ll receive a post care and maintenance kit that will include a customized whitening trays (if you decided to get the trays), 1 instruction booklet, 1 Relief ACP Oral Care Gel + tip, and 1 Philips Zoom NiteWhite or DayWhite + tip. This kit helps extend the whitening effects for a longer period of time.
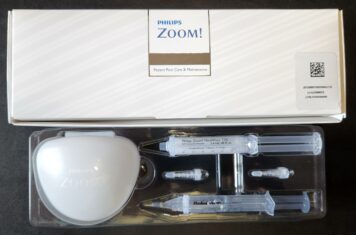
Post Care and Maintenance Kit
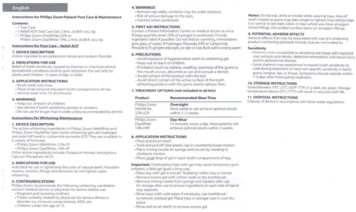
Zoom Booklet and Other Information
More info: